How to install a Bridge Saw Machine?
Sep 26, 2025
Leave a message
Hey there! As a supplier of Bridge Saw Machines, I'm super excited to walk you through the process of installing one of these bad boys. Whether you're a seasoned pro in the stone-cutting industry or just starting out, getting your Bridge Saw Machine up and running correctly is crucial for top-notch performance. So, let's dive right in!
Pre-Installation Preparations
Before you even start unpacking the Bridge Saw Machine, there are a few things you need to take care of. First off, you gotta find the perfect spot for it. The installation area should be flat, stable, and large enough to accommodate the machine and give you some room to move around. A concrete floor is ideal because it can handle the weight and vibrations of the machine without any issues.
You'll also need to make sure there's a reliable power source nearby. Check the machine's power requirements in the manual. Most Bridge Saw Machines need a three-phase power supply, so ensure your electrical system can handle it. If you're not sure, it's always a good idea to consult an electrician.
Another important thing is water supply. Bridge Saw Machines use water to cool the blade and reduce dust during the cutting process. You need to have a continuous and clean water source connected to the machine. A standard garden hose connection usually works fine, but make sure the water pressure is within the recommended range.
Unpacking and Inspection
Once you've got the perfect spot and all the necessary utilities sorted, it's time to unpack the Bridge Saw Machine. Be careful while unpacking to avoid any damage to the parts. As you take out each component, inspect them for any signs of damage or missing pieces. If you find anything wrong, contact our customer support right away. We're here to help you sort out any issues.
Assembly
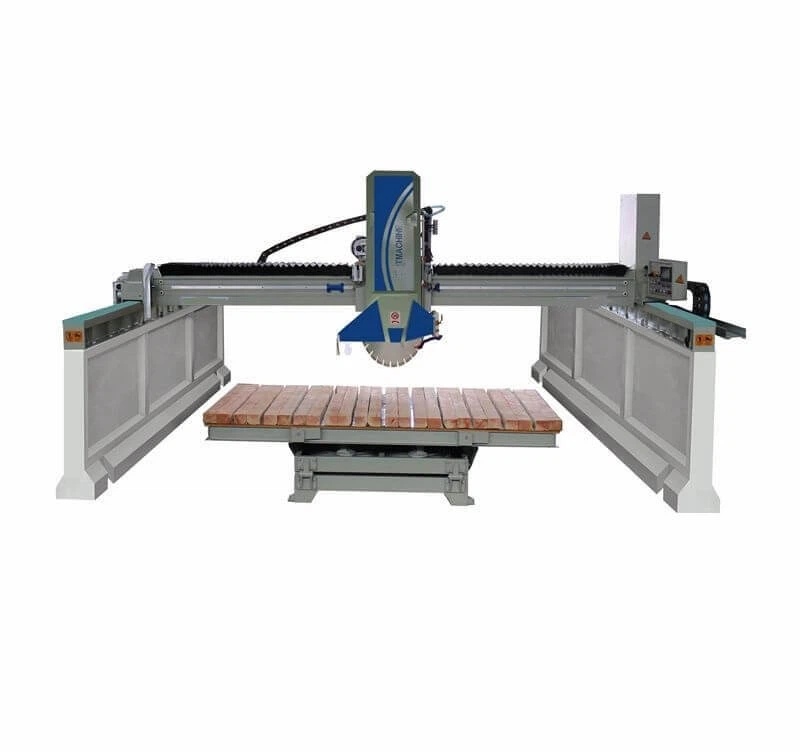
Now, let's start assembling the machine. The first step is usually to install the base. The base is the foundation of the Bridge Saw Machine, so it's important to get it level. Use a spirit level to make sure the base is perfectly horizontal. Once it's level, secure it to the floor using the provided bolts or anchors.
Next, it's time to attach the bridge. The bridge is the part that moves back and forth and holds the cutting blade. Carefully lift the bridge onto the base and align it with the tracks. Make sure it slides smoothly along the tracks without any resistance. If there's any rubbing or sticking, you may need to adjust the alignment.
After the bridge is in place, install the cutting head. The cutting head is where the blade is mounted. Follow the instructions in the manual to attach it securely to the bridge. You'll also need to connect the water lines and electrical cables to the cutting head. Double-check all the connections to make sure they're tight and secure.
Blade Installation
The blade is one of the most important parts of the Bridge Saw Machine, so you need to install it correctly. First, make sure the power is turned off and the machine is unplugged. Then, remove the blade guard from the cutting head. Place the blade onto the arbor, making sure it's centered and aligned correctly. Tighten the blade nut securely using a wrench.
Once the blade is installed, put the blade guard back on. The blade guard is an important safety feature that protects you from flying debris during the cutting process. Make sure it's properly secured and in good working condition.
Calibration and Testing
After the machine is fully assembled and the blade is installed, it's time to calibrate and test it. Start by checking the blade alignment. Use a straightedge to make sure the blade is perfectly vertical and parallel to the cutting table. If it's not, you can adjust the blade alignment using the adjustment screws on the cutting head.
Next, turn on the water supply and check for any leaks in the water lines. Make sure the water is flowing freely to the blade. Then, turn on the power and let the machine run for a few minutes without making any cuts. Listen for any unusual noises or vibrations. If you notice anything wrong, stop the machine immediately and check for the cause.
Once you're satisfied with the calibration and the machine seems to be running smoothly, it's time to make a test cut. Use a scrap piece of stone or tile to test the cutting performance. Make sure the cut is clean and straight. If the cut is rough or uneven, you may need to adjust the blade speed or the feed rate.

Maintenance Tips
Now that your Bridge Saw Machine is up and running, it's important to take good care of it to ensure its long-term performance. Regular maintenance is key. Here are some tips:
- Keep it clean: After each use, clean the machine thoroughly to remove any dust and debris. Use a soft brush or compressed air to clean the hard-to-reach areas.
- Lubricate the moving parts: The tracks, bearings, and other moving parts need to be lubricated regularly to reduce friction and wear. Use the recommended lubricant and follow the instructions in the manual.
- Check the blade regularly: Inspect the blade for any signs of wear or damage. Replace the blade if it's worn out or damaged to ensure optimal cutting performance.
- Calibrate the machine periodically: Over time, the machine may lose its calibration. It's a good idea to calibrate the machine periodically to ensure accurate cuts.
Conclusion
Installing a Bridge Saw Machine may seem like a daunting task, but if you follow the steps outlined in this blog post, you'll be able to do it successfully. Remember, if you have any questions or run into any problems during the installation process, don't hesitate to contact us. We're a Bridge Saw Machine supplier, and we're here to support you every step of the way.
If you're in the market for a high-quality Bridge Saw Machine, check out our Bridge Saw Stone Tile Cutter, Stone Granite Miter Saw Machine, and Stone Bridge Cutter. We offer a wide range of machines to suit your specific needs and budget.
If you're interested in purchasing a Bridge Saw Machine or have any questions about our products, feel free to reach out to us. We're always happy to have a chat and discuss your requirements. Let's work together to take your stone-cutting business to the next level!
References
- Bridge Saw Machine Installation Manual
- Stone Cutting Industry Best Practices Guides
Send Inquiry